

How To Create A Taxonomy In Wordpress
You've probably heard the word taxonomy used before, probably in relation to WordPress posts. But what is a taxonomy? And what are they used for in WordPress?
In this post, we'll explain what a taxonomy is and show you how to create a custom one for your own site. Taxonomies are a really simple but useful way to add extra functionality and customization to your website.
Let's get organized!
- What Is a Taxonomy?
- How to Create a Custom Taxonomy in WordPress
- How to Display Taxonomies on Your Site
- WooCommerce and Taxonomies
- Conclusion
What Is a Taxonomy?
A taxonomy is just a scientific word for saying classification. Taxonomies are used in biology to separate animals from plants, or from certain kinds of animals from each other. Here's a simple example:
- Life
- Animals
- Dogs
- Humans
- Plants
- Flowers
- Sunflowers
- Roses
- Trees
- Flowers
The item Dogs, for example, is included under Animals, which is included under Life. So, any item labeled with Dogs is a member of these three hierarchical "categories" at the same time.
Taxonomies in WordPress: Categories and Tags
Taxonomies are used extensively in WordPress, specifically for Posts. In WordPress, there are two taxonomy systems built-in by default for use with Posts: Categories and Tags. You've probably used both of them before to organize your content.
But what if you want to have a more complex structure for your posts? And what if you want to use custom post types, then sort them with something more specific than just categories or tags? For example, you may want to have a custom post type named Recipe and then sort it by Ingredient.
Or, you may want to divide your posts into separate areas on the backend on your WordPress site in order to make it easier to manage your content.
That's where custom taxonomies come in. With a custom taxonomy, you can create complex structures that divide your content into different sections. These can also be organized hierarchically, like our Life taxonomy above.
Custom taxonomies can also make life easier for your clients. You can create custom post types and taxonomies for them, which are then displayed on the WordPress sidebar.
Flat vs. Hierarchical
When creating a taxonomy, you can make them either flat or hierarchical. What's the difference? It's simple: a flat taxonomy has only one level, while a hierarchical one has many levels.
In WordPress, tags are flat, while categories are hierarchical. In other words, you can nest categories inside each other, while tags are just all on the same level.
Flat Taxonomy
In a flat taxonomy, everything is on the same level.
- Bananas
- Lemons
- Pineapples
Hierarchical Taxonomy
In a hierarchical taxonomy, levels can have parent or child levels.
- Fruits
- Yellow Fruits
- Bananas
- Cavendish Bananas
- Pisang Raja Bananas
- Lemons
- Pineapples
- Yellow Peppers
- Bananas
- Yellow Fruits
Who Uses Taxonomies?
Variety.com is a great example. Since they cover a variety of different topics, it is natural for them to have them categorized into different sections like FILM, TV, MUSIC and EVENTS.Taxonomies are used by a wide variety of websites, especially those with a range of different content topics.

By organizing their site into separate taxonomies, they can make it easier to manage the hundreds of different posts, videos, images, and other content they post every week.
How to Create a Custom Taxonomy in WordPress
Now that you know what a taxonomy is and why you should use one, let's walk through using it! There are two ways to add a taxonomy:
- With a plugin
- Manually with code
Method 1: With a Plugin

The easiest way to add a custom taxonomy to your site is by using a plugin. There are many available, but the two most popular are Custom Post Type UI and Pods. Since it is less complex and easier to use, we'll use Pods for this tutorial.
Let's walk through using it!
For this example, we'll imagine you're creating a website that features recipes. First, we'll make a custom post type called Recipes. Then, we'll create a custom taxonomy to organize different aspects of each recipe, like Ingredients, Allergies, Vegetarian/Non-Vegetarian, and similar things.
Step 1: Download and Install the Plugin
First, download, install, and activate the plugin from the WordPress repository.
Step 2: Create a New Custom Post Type
For our example, we'll first need to create a new custom post type. Go to Pods Admin > Add New on your WordPress sidebar.
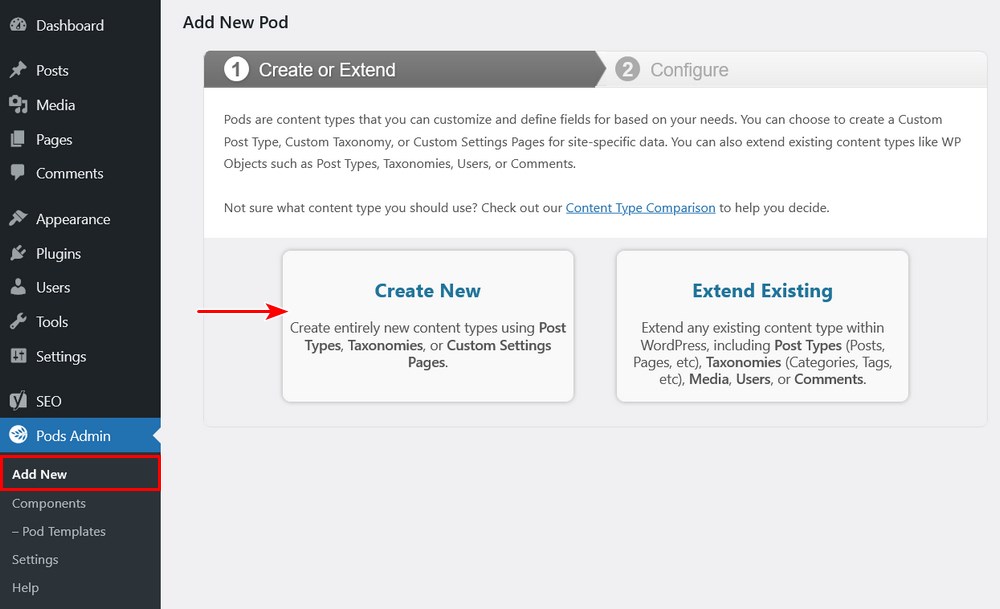
You'll now see two options: Create New and Extend Existing. Click Create New.
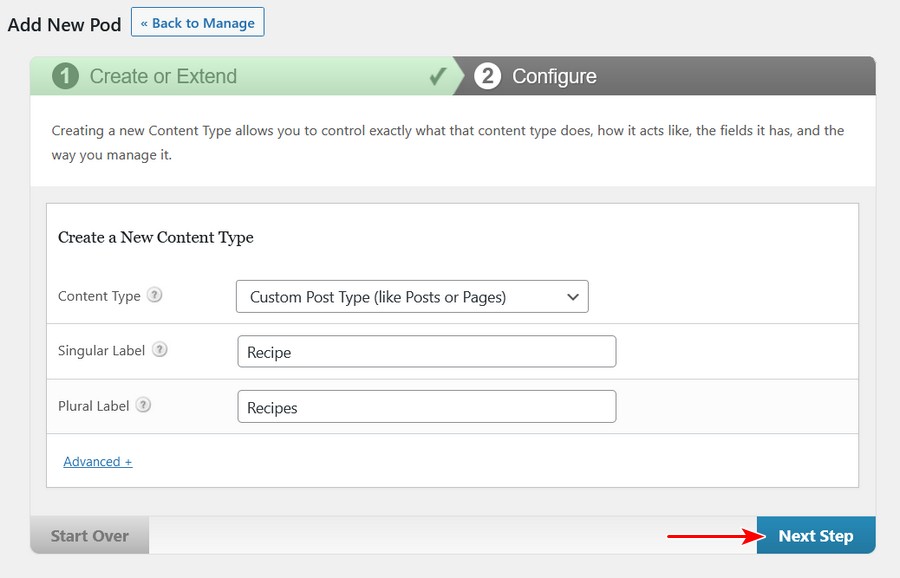
Now you choose what you want to create. We will first create a Custom Post type. Under Singular Label, type Recipe and under Plural Label, type Recipes. Then click Next Step.
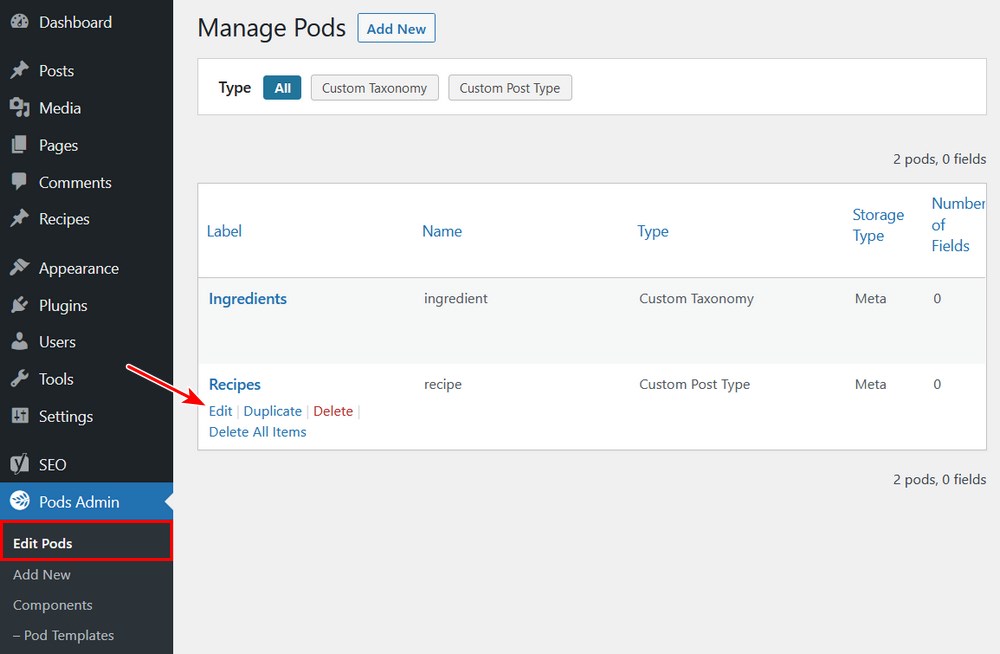
You'll see a confirmation message that your pod was created successfully. Now we need to create a new Taxonomy. Go back to Pods > Add New.
Click Create New again. This time, select Custom Taxonomy under Content Type. Below, type in Ingredient and Ingredients. Then, click Next Step.

As a final step, we need to link the Custom Post Type to the taxonomy. Go back to the Edit Pods page and click Edit under your Custom Post Type (Recipes in our example.)
Now go to the Advanced Options tab.
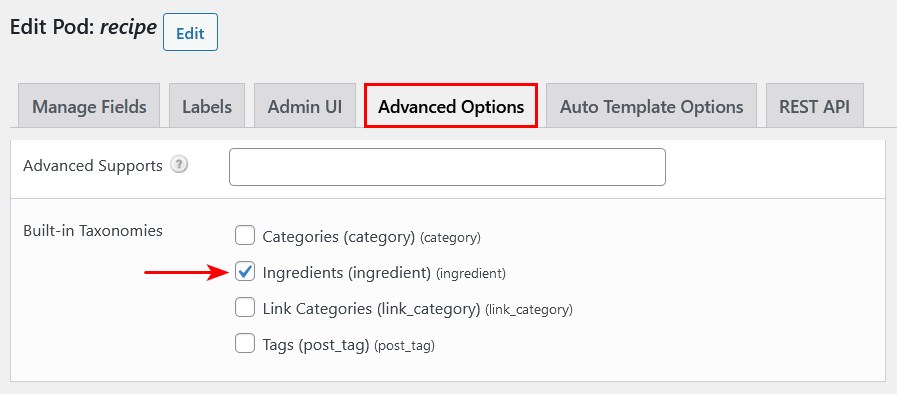
Scroll down to Built-in Taxonomies and check the box next to the newly created taxonomy. In our example, it's Ingredients.
Now let's test it! If you look on your sidebar, you'll notice a new item: your custom post type with the custom taxonomy (Ingredients) below it. Pretty cool!
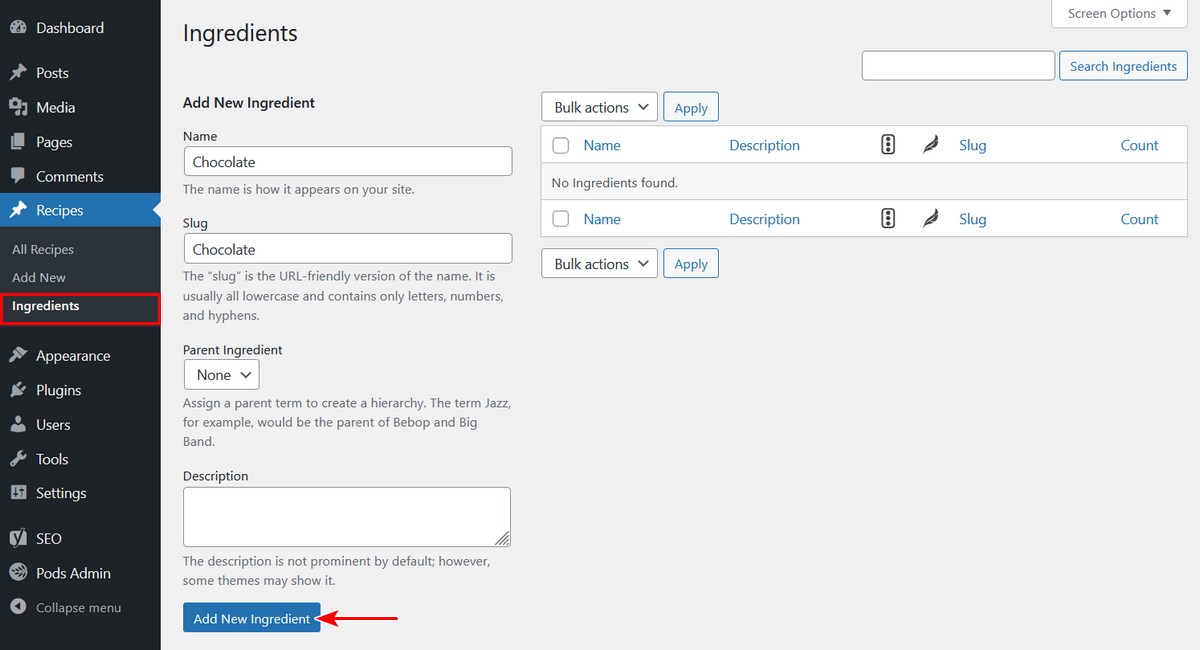
Click on Ingredients to see a list of them. Right now, we don't have any. Let's add one. On the left-hand side, fill out the form and create a new ingredient. For our example, let's use Chocolate.
On the right-hand side, Chocolate will now be displayed. Pretty easy!
Now let's create a new post under Recipes. Click Add New.
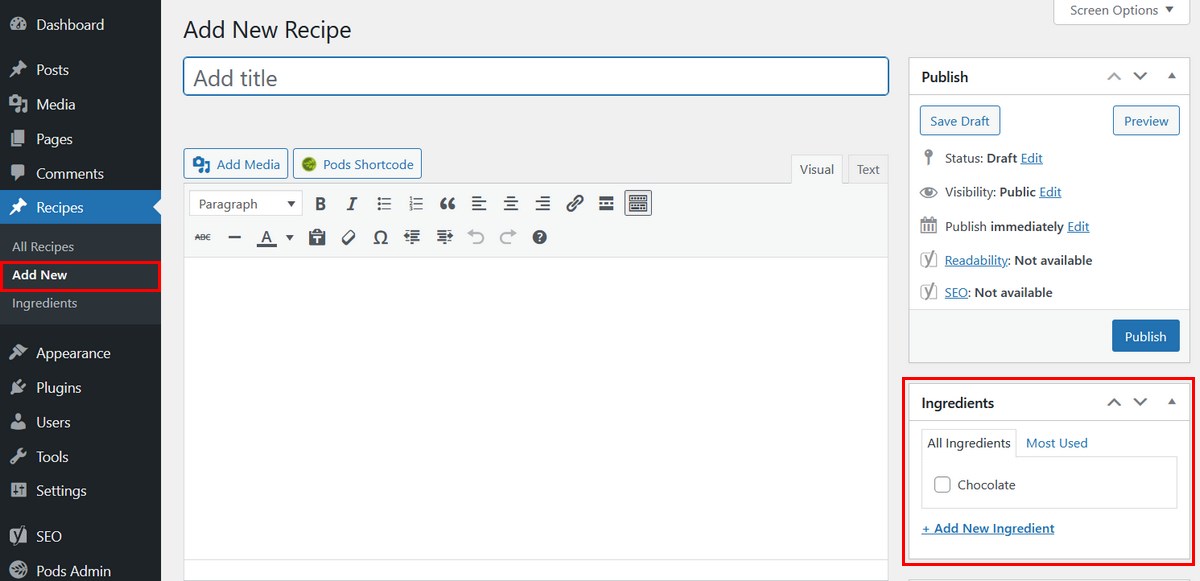
On the right-hand side, you'll see Ingredients listed, with Chocolate as an option. Notice that this is usually where you add Categories to your posts.
And that's it! To add more items to your taxonomy, you can either do it manually via the Ingredients panel or from directly within the post.
Method 2: Manually
If you're a developer or you don't want to use a third-party plugin, you can also add custom taxonomies manually. In the example below, we'll show you how to add a new taxonomy to your regular WordPress posts.
First, create a blank text file on your computer using a text editor program. Paste the following code into it, replacing the variables with your desired ones.
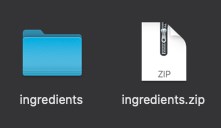
<?php /* * Plugin Name: Ingredients Taxonomy * Description: A short example showing how to add a taxonomy called Ingredients. * Version: 1.0 * Author: wpastra.com * Author URI: https://wpastra.com/ */ function wporg_register_taxonomy_ingredients() { $labels = array( 'name' => _x( 'Ingredients', 'taxonomy general name' ), 'singular_name' => _x( 'Ingredients', 'taxonomy singular name' ), 'search_items' => __( 'Search Ingredients' ), 'all_items' => __( 'All Ingredients' ), 'parent_item' => __( 'Parent Ingredients' ), 'parent_item_colon' => __( 'Parent Ingredient:' ), 'edit_item' => __( 'Edit Ingredient' ), 'update_item' => __( 'Update Ingredient' ), 'add_new_item' => __( 'Add New Ingredient' ), 'new_item_name' => __( 'New Ingredient Name' ), 'menu_name' => __( 'Ingredients' ), ); $args = array( 'hierarchical' => true, // make it hierarchical (like categories) 'labels' => $labels, 'show_ui' => true, 'show_admin_column' => true, 'query_var' => true, 'rewrite' => [ 'slug' => 'ingredient' ], ); register_taxonomy( 'ingredients', [ 'post' ], $args ); } add_action( 'init', 'wporg_register_taxonomy_ingredients' ); ?> Save the file as ingredients.php. Then, create a folder, give it a name, and put the text file in that folder. Compress the folder into a zip file.
Now, go to your WordPress site. Navigate to Plugins > Add New on your sidebar.
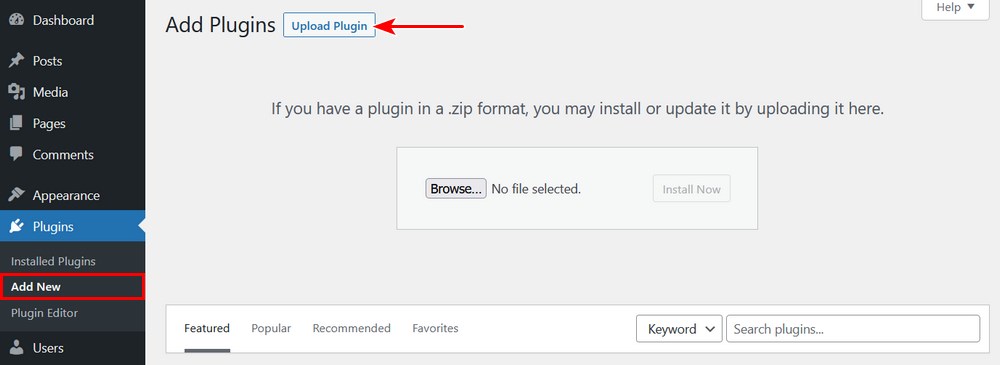
Click Upload Plugin and select your zip file. Then, activate it.
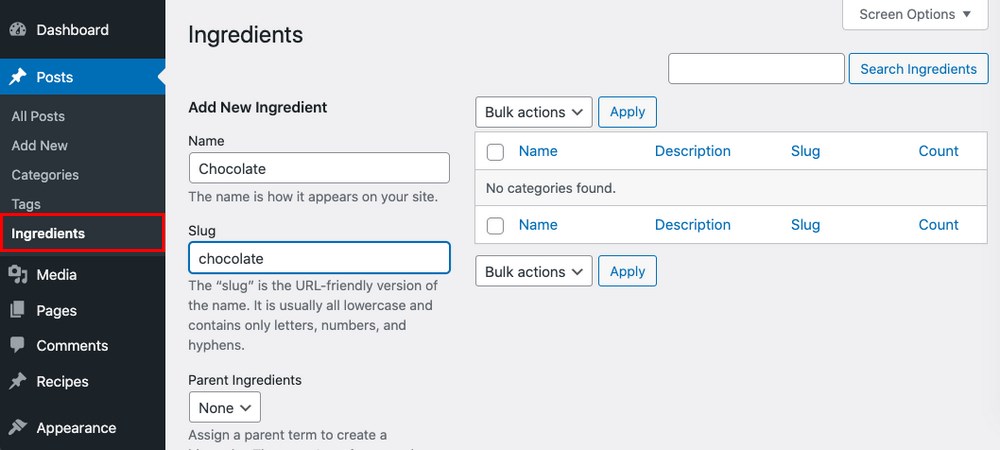
You'll now see that Posts has a new submenu item: Ingredients. Click on it.
Here you can add new items to the Ingredients taxonomy. For example, let's add Chocolate.
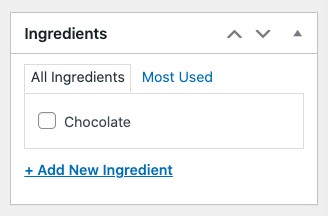
If we now go and edit a post, you'll see the Ingredients taxonomy on the sidebar, underneath categories.
Nice job! That just about covers it.
Note that you can also just add this code to your theme, instead of a plugin. However, any changes to a regular theme will be overwritten when it is updated. As such, we recommend creating a child theme instead.
To create a child theme, read our guide to the topic. You'll especially need to read the Functions.php section, which is at the end of the post.
Read more about taxonomies on official WordPress documentation page.
You can also create a Custom Post Type, like we did in the first example. Learn more about that here in the WordPress documentation.
How to Display Taxonomies on Your Site
Now that you've created a taxonomy, you might want to display it on your website. There are a few different options:
- In a menu
- In a widget
- Anywhere with a shortcode
In a Menu
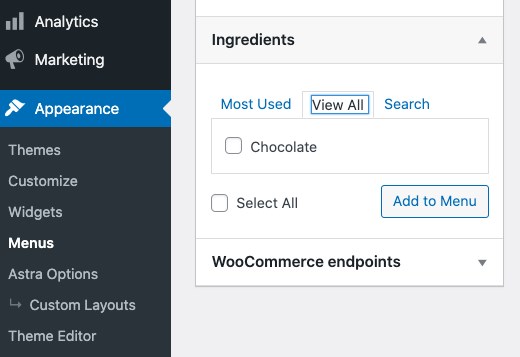
To add your taxonomy to a menu, simply go to the Appearance > Menus tab on your sidebar. You'll see the taxonomy listed next to other items.
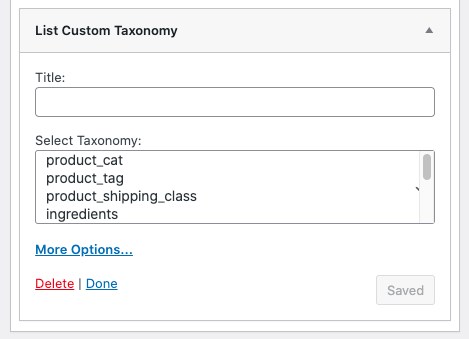
In a Widget
Want to put your taxonomy in a widget? The easiest way is by using a little plugin called List Custom Taxonomy Widget. With it, you can quickly add any taxonomy to a widget.
With a Shortcode
Finally, you can add your taxonomies anywhere by using a shortcode. The plugin Taxonomy List makes it very simple.

Once you install and activate the plugin, add a taxonomy by using the shortcode format in the image above.
WooCommerce and Taxonomies
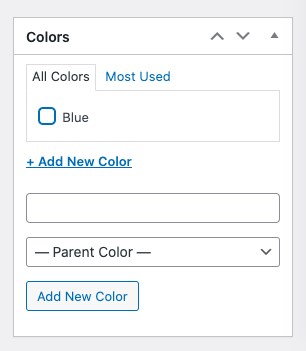
Finally, let's talk about taxonomies and WooCommerce. Creating a taxonomy for your WooCommerce products can help customers further filter products to find exactly what they need. For example, you can add a colors taxonomy to organize all of your products by color.
New to WooCommerce? Check out our guide to setup up WooCommerce.
By default, WooCommerce creates a number of post types and taxonomies. Specifically, it creates 4 post types:
- Product (product)
- Shop order (shop_order)
- Shop coupon (shop_coupon)
- Shop webhook (shop_webhook)
…and 6 taxonomies:
- Under the product custom post type:
- Product categories: (product_cat)
- Product tags: (product_tag)
- Product variation: (product_variation)
- Product visibility: (product_visibility)
- Under the shop order custom post type:
- Order statuses: (shop_order_status)
- Order refunds: (shop_order_refund)
To create a new custom taxonomy for WooCommerce, just follow the steps above. Once you create the taxonomy, go to the Advanced tab and scroll down to Associated Post Types. There, you'll see the taxonomies associated with WooCommerce listed.
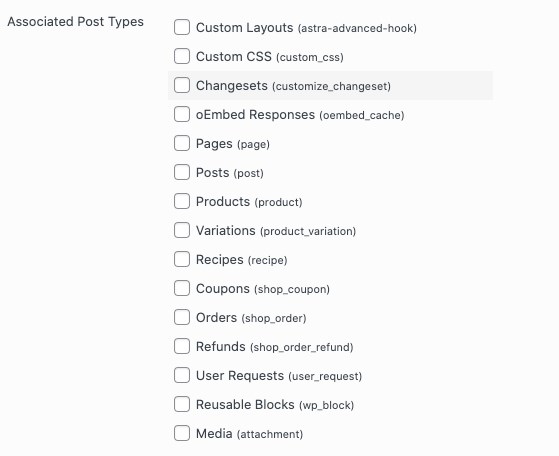
Select one, then go to the respective page for the item. For example, if you linked it to shop_coupon, go to Marketing > Coupons on your WordPress sidebar and create a new coupon.
You'll now see the new taxonomy listed on the right side of the page:
Conclusion
You're now a taxonomy expert! In this post, you learned what a taxonomy is, why you should use them, and how to set them up. We also looked at using taxonomies with WooCommerce.
Finally, we showed you how to display them on your WordPress site via a menu, widget, or shortcode. While taxonomies are often used for the back end of your site, they're also quite useful to display on the front end too.
Do you use taxonomies on your site? What for? Do they improve your productivity? Let us know in the comments!
How To Create A Taxonomy In Wordpress
Source: https://wpastra.com/wordpress-custom-taxonomies/
Posted by: woodovesibly.blogspot.com
0 Response to "How To Create A Taxonomy In Wordpress"
Post a Comment